What is the SRS Glider Trimmer?
Paraglider trimming is the process of adjusting a paraglider’s line lengths to match the manufacturer’s specifications, restoring optimal performance and handling. Over time and with use, paraglider lines can stretch or shrink, affecting the wing’s angle of attack and leading to reduced performance and potentially unsafe handling characteristics. Trimming involves measuring and adjusting the lines to correct these deviations, often utilizing trimmers, maillons, or knots.
What is different about this trimmer?
The SRS trimmer has been designed to be both accurate, and lightweight, suited to travel to events so that trimming can be performed between tasks.
The trimmer has a number of features which include the following:
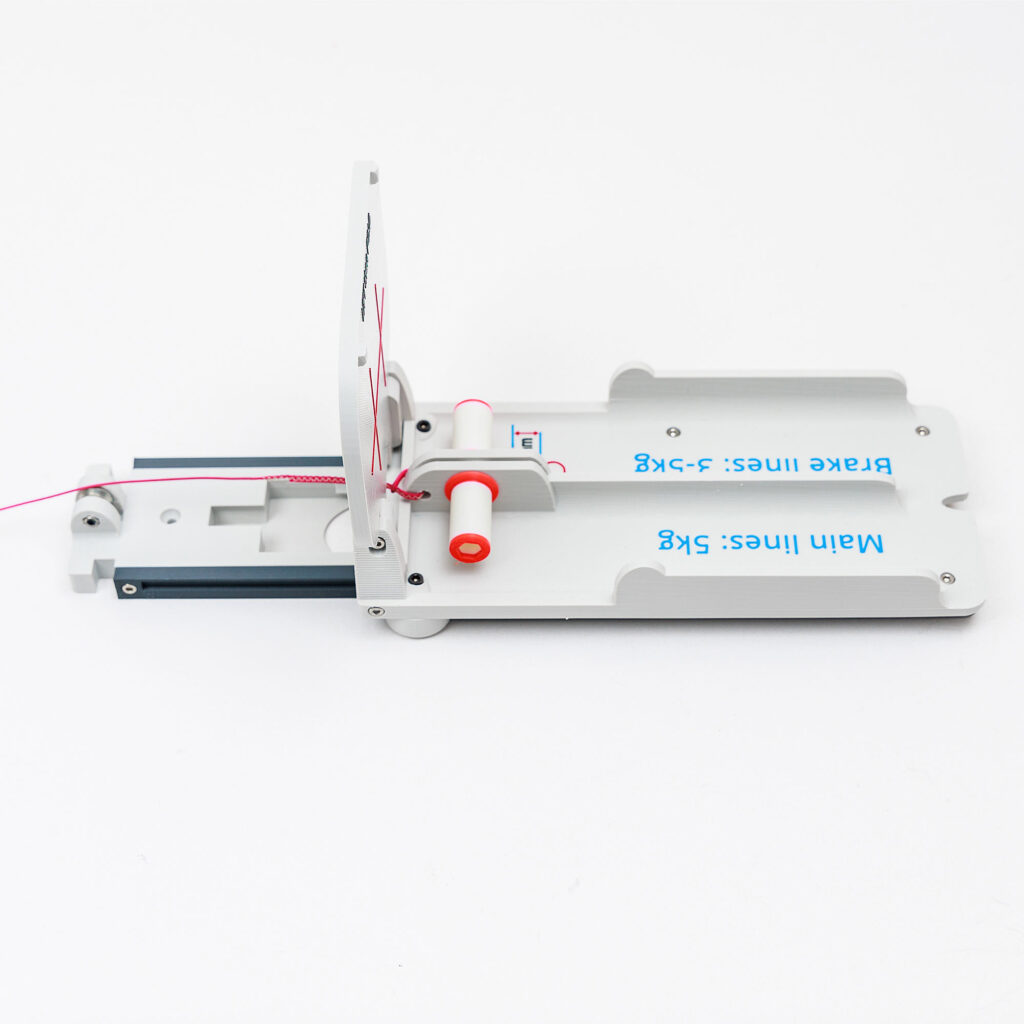
- Lightweight. Typically around 340 grams, including carry bag.
- Portable. Measuring under 25 x 13 x 5 cm. (based on Version 3.1)
- Strong. Made from ASA, similar to Nylon it is both heat and UV stable and incredibly strong.
- Accurate. The repeatability of the device is <0.5mm per use.
- In general competitions, this is by far the most common trimmer in use. It can be regularly seen at PWCA’s, SRS’s and more.
How to purchase one?
You can purchase them direct from Cross Country Magazine. Occasionally you may find them being distributed at some events.
What features does it have?
The trimmer has some unique properties, not seen on other trimmers available:
- The backplate can be folder for easy transport, yet locks at exactly 90 degrees for use when trimming.
- The moving parts are all ball raced for low friction. In total, five stainless steel bearings are fitted.
- The device can be put onto a table and needs no securing for normal use.
- There are holes on the base, for those that wish to permanently fix it in a workshop.
- It is compatible with any standard laser measure found on the market.
- It has dimensional information printed on the device, for easy setup on platforms such as https://we-measure.io/
- Version 3.1 onwards has a storage compartment to hold needles and string, for advanced trimming.
- Version 3.1 onwards has a measure printed so you can adjust lines to 1mm precision, without remeasuring.
How to use it ?
Trimming is not difficult, but to do it accurately takes practice and understanding.
WARNING
Any measurements, checks and adjustments you make you do at your own risk. If any in doubt then seek the advice of an experienced professional.
| About the glider trimmer | ||
| The SRS glider trimmer is a specialized tool for checking the trim of your paraglider. These instructions are only an initial guide on how to do this. Be sure to understand any alterations you make to your glider as a badly trimmed wing can lead to injury or death. In addition to the trimmer you will need to purchase a laser measure and a trimming sheet for your glider. There are two types of laser measure generally available. Simple, low cost lasers such as the Bosch PLR 30 C Digital Laser Measure or fully featured, with Bluetooth/, like the Leica DISTO D1/D2 series. | Trimming sheets are usually in Excel format, and can be obtained from the manufacturer of your wing. These allow you to enter the measurements and the sheet will tell you if your wing is too fast or too slow, with an indication of what changes to make. The trimming tool is designed to be lightweight and suitable to take on your travels. The materials used in the construction are UV and heat resistant. There also an excellent website which allows for easy measuring and gives helpful trimming advice when measured. It has a very complete database of wings to select from. https://we-measure.io/ | |
| ASSEMBLY | ||
| The trimmer is mostly pre-assembled. You can use it as supplied, or attach one or both of the accessories. In the box (V1 & V2): 1x trimmer, preassembled 1x kicker plate 1x front stabilizer. The V3 comes preassembled. | ||
You can use it without fitting either accessories by simply putting some thin double sided tape onto the underneath main body and sticking it to a table. The rear H pulley wheel should be hanging over the edge of the table. Attach a 5kg weight to the line running through the pulley, such that the line is taught, and the weight just resting on the ground. Optionally, and recommended, is to fit the kicker plate to the rear of the device (Fig 1) 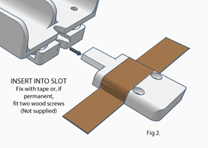 | 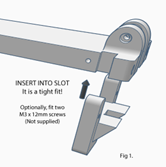 The front stabilizer is intended to stop the trimmer lifting when a heavy weight is attached to the rear. You can either screw it to a desk, if it is to be permanent, or you can attach it temporarily with either tape over the top, or double sided tape on the bottom. Fig2. | |
| USAGE The lines must be loaded with a weight before measuring so that they stretch to a stable length. In our testing we found lines loaded between 4kg and 6kg only varied in length by 1 or 2 mm*. Less than 3kg showed increasingly different variance. Attach a 5kg# weight to the end of the line, such that the weight is just resting on the floor, with the line under tension. You could use water bottles, ballast bag or any such compact weight suitable for tying to the line. *Tests were performed with unsheathed lines as found on the Enzo. Sheathed lines would show a greater difference due to the characteristics of shrinkage on the outer, protective, sheath. # Some gliders, for example the Gin Leopard, may not be suitable for 5kg on the upper brake lines. In this instance, use a 3kg. Brake lines rarely need measuring though as they are variable in length by the nature of what they are. 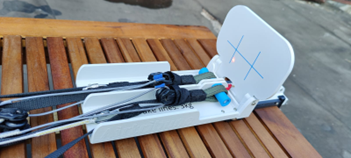 WARNING: PACKING AWAY Pay attention when folding the back plate. You must first lift the plate, then fold it forwards or you may damage the mechanism. | Fix the trimmer to a desk, overhanging one edgeAttach the 5kg weight to the trimmer.Attach the glider to the trimmer by the risers.Open your glider trimming sheet.In a methodical manner, measure each complete line set, from the knot at the glider cloth to the backboard on the trimmer.Record this measurement on the trimmer sheet.Repeat for every line set on the glider until complete.Analyze the data presented for how the trimming adjustment must be made. If you are unsure how to use this data, then seek the advice of an experienced pilot.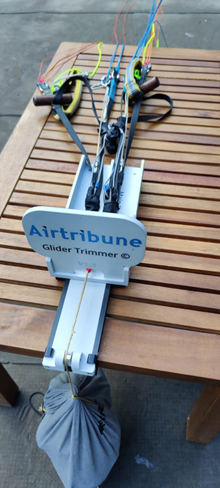 |